Brother Printer Connectivity over Wireless Network for Macintosh

brother-printer-connectivity-issue

If you are having trouble with network connectivity for your Brother printer over a Wireless connection, here is a verification process. This will allow you to check if your Brother printer is connected over Wireless Network.

Step1: Make sure the printer is powered ON

  • Check if the printer is powered on. If the printer’s display (LCD) is blank, the machine is powered off. Press any button to see if it comes out from sleep mode. If not, check the connection with power switches.
  • Check if the printer display screen shows any error message like ‘Paper Jam.’ If so, troubleshoot the error.

Step2: Verify Wireless Connection

If everything is fine with the printer in the above step, let’s move on by checking the wireless connection status. For this, you need to print the Network Configuration List. In case the Wireless Link Status is OK, move to Step3. If the Wireless Link Status has any error, move to Step4.

Step3: Verify communication between Printer and Computer

  • Get the printer’s IP address from the Network Configuration list printed in step 2. If the IP address is invalid, go to Step4.
  • Get the computer’s IP address.
  • Go to the Apple menu and select ‘System Preferences’ from the drop-down.
  • Click Network
  • Note the IP address mentioned under ‘Status’ heading.
  • Check the following for your computer and Brother Printer IP address.
    • PC IP address:168.1.2
    • Brother machine IP address:168.1.199

(The part of the IP address that is bold should be the same in both IP addresses. The number at the end is unique and is from 2 to 254.)

Ping the Brother machine:

  • On Mac OS X 10.9, click Go from the Finder bar, Computer>Macintosh HD>System>Library> CoreServices>Applications>Network Utility.
  • On Mac OS X 10.4 to 10.8, click Go from the Finder bar, Applications>Utilities>Network Utility.
  • Click on the ‘PING’ tab at the top and enter the IP address of the brother machine in the appropriate field.
  • Click on ‘Send only _ pings’ radio button and make sure the value in the box is 4.
  • Click on the ‘Ping’ button.
  • If you receive a reply from the printer’s IP address, it indicates communication between the computer and the printer.
  • Close the window.
  • If you don’t receive a reply, there is a communication issue and you need to troubleshoot it.

Step4: Establish Wireless Network Connection

  • Reset the network settings to factory default.
  • Follow the instructions provided with your wireless router and establish a wireless network connection.

If any problem occurs, get our Brother Printer Technical Support service which is available 24 hours.

Brother Printer Driver Installation Issue

brother-printer-driver-installation-issue

Situation: You have not connected Brother Printer to your PC.

Solution: Download the drivers and install them on your PC. Before you start the process, disconnect the USB cable from your PC. These steps will work for Windows XP and Vista.

4 Steps To Fix Brother Printer Driver Installation Issue

  1. Create a Folder
  • Right-click anywhere on the free space on your desktop and select ‘New’ from the drop-down menu.
  • Click on ‘Folder’ from the pop-out.
  • Name the folder ‘Brother.’
  1. Download the Printer Driver

Instructions are for Internet Explorer 7 and above versions.

  • Go to support.brother.com.
  • Select your region/country. Click on ‘Change Country (Language)’ to make changes.
  • Select your model from the series menu.
  • Click on the ‘>>’ icon to confirm.
  • Choose ‘Downloads’, select (ALL).
  • Select your OS, select your preferred language and click the ‘Search’ button.
  • Choose WHQL Certified Driver.
  • Click ‘More Information’, click ‘Download.’
  • Click ‘I Accept’ after reading the End Users License Agreement.
  • Click ‘Save’ on the window that appears.
  • Select the ‘Brother’ folder you have created on your desktop (in step 1). Click ‘Save.’
  1. Decompress the downloaded driver
  • Open the ‘Brother’ folder on the desktop.
  • Double click on the downloaded file with .exe extension.
  • If the ‘Open File – Security Window’ appears, click ‘Run’, else continue.
  • Click ‘Browse’ at the WinZip Self extractor.
  • Select the ‘Brother’ folder and click ‘OK.’
  • Click ‘Unzip.’
  • Click ‘OK’ to confirm.
  • Close the WinZip Self Extractor window.
  • The system will create a folder ‘English’ or other depending upon your language.
  1. Install Printer Driver

For Windows XP

  • Connect the interface cord and power ON the Brother printer.
  • In the New Hardware Wizard, select ‘No not at this time’ and click ‘Next.’
  • Choose ‘Install from a list or specific location (Advanced)’ and click ‘Next.’
  • Select ‘Search for the best driver’ in these selections. Check the box in front of ‘Include this location in the search.’
  • Click ‘Browse’ and select the ‘Brother’ folder. Click ‘OK.’
  • Click ‘Next’ and click ‘Finish.’
  • You will see a message ‘Your new hardware is installed and ready to use’ at the bottom left of your desktop.

For Windows Vista

  • Connect the interface wire and power ON your Brother printer.
  • ‘Found New Hardware’ window will appear. Select ‘Locate and install driver software (Recommended.)’
  • Click ‘I don’t have the disc. Show me another option.’
  • Click ‘Browse my computer for driver software (Advanced.)’
  • Click ‘Browse’ and select the ‘Brother’ folder. Click ‘OK’ and click ‘Next.’
  • When ‘The software for this device has been successfully installed’ window appears, click ‘Close.’
  • You will see a message ‘Your devices are ready to use’ at the left bottom of your desktop.

For further queries, contact Brother Printer Technical Support.

How You Can Easily Fix Error 46 on Brother Printer

brother-printer-error-46

Do you see Error 46 (Unable to Clean) on your Brother Printer screen? Your printer must old enough as the error implies that the ink absorber pad is full and you need to replace it. The ink absorber accommodates dried and liquid ink after it purges from the print head. The absorber is designed to carry enough ink throughout the expected life of the printer. But sometimes it gets full depending on the number of times the print head is cleaned. Here are some situations when the printer head cleans itself automatically:

  • When the Brother machine performs the initial purge.
  • You power off the machine when it’s not being used. When you turn it on, a complete cleaning cycle will run.
  • The print head is cleaned automatically before the first print after the paper jam is resolved.
  • If the print head is not capped properly, the printer will run an automatic cleaning.
  • If you replace the empty ink cartridge when the printer is off, a print head auto-clean will run when you power it on.
  • If the printer is power on without any use for 45 days, the print head will be cleaned automatically.

In Machine error 46; dismantle the printer, replace the ink absorber box and re-assemble the printer. After this, you need to reset the purge counter to zero. Here are the steps you need to follow:

  • Enter into ‘Machine Maintenance’ mode. Work carefully in this mode without corrupting the critical settings.
  • FAX models with numerical keypads: Press these keys (Menu/Set, *, 2, 8, 6 and 4) within 2 seconds. If you can’t, press the Stop key and try again.
  • Non-FAX models: Press the Menu/Set and Black Start keys. Now press the ‘up arrow’ keys 4 times for entering maintenance mode.
  • Press 8 key and then 0 key (function code 80) in the initial stage of maintenance mode. This will get the machine’s log information list.
  • Press the Black Start key many times to move through the log information list and reach the purge counter.
  • Press 2, 7, 8 and 3 keys strictly in the same order. This will reset the purge counter to zero.
  • Press Stop/Exit key to return to the initial stage of maintenance mode.
  • Press the 9 key twice and return to the standby state.

In case you still see the error, contact Brother Printer Support.

Tips to Fix Most Common Lexmark Printer Error Codes

lexmark-printer-error-codes

Lexmark printers are known among home users and professionals for their reliability. Like every other printer, they also cause some issues. These issues are communicated to users through error codes. If you know what these error codes stand for, you can handle most of the issues yourself and save on the repair charges. Here are some of the common error codes with their interpretation and solutions.

Error Code: 200 & 201

Interpretation: Paper Jam. Error 200 indicates that paper is blocking the printer pathway while error 201 means there is paper stuck between printers’ input and output sensors.

Solution: Both these errors can be corrected by removing the paper carefully from the printer’s pathway. Follow the instructions below:

  • Open the front door on the upper side.
  • Holds the print cartridge with both hands and pulls it out gently (pull towards you and lift it up.)
  • Push the feed roller release lever back to release the pressure on the paper.
  • Pull out the paper gently and cautiously as it could stain your garments from toner.
  • If there is no paper jam under the cartridge, remove the paper tray and reinstall it. Re-install the toner cartridge and close the door.

Error Code: 80

Interpretation: Modern Lexmark printers have a counter that notifies about maintenance. This counter records the number of printed pages. The error message means that the maximum pages have been printed.

Solution:

Purchasing a maintenance kit and replacing it is the solution here. You can buy a Lexmark maintenance kit for the better performance of your printer.

Error Code: 900

Interpretation: Service Error. This error occurs due to hardware or network issues. If the printer is connected to the computer and the error occurs, it is network-related. While if the printer and computer are not connected and the error occurs, it is hardware related.

Solution:

Checking the computer-printer connection can resolve the issue. You can take technical help for hardware fixes.

Error Code: 901

Interpretation: Engine Flash Error. It occurs due to temporary glitches in the engine.

This error often occurs due to a temporary engine glitch. To clear a 901 error, simply turn off the printer for at least five minutes. If the error doesn’t return after powering on the printer, a temporary glitch was the issue and shouldn’t require any further troubleshooting.

Solution: To solve this error, simply power off the printer for 5 minutes and then again turn it ON. If the error is gone, it doesn’t require further troubleshooting. If it exists, take Lexmark Printer’s technical support.

Error Code: 902

Interpretation: Engine Board Software Failed.

Solution:

Turn off the printer for 10 minutes and then turns it on to see if the error is gone. If this doesn’t help, seek help from a technician.

Error Code: 903, 904, 905 and 906

Interpretation: Fault in the printer’s system board.

Solution:

Power off the printer and power it on after 10 minutes. If the error is gone, try printing some pages and keep an eye on the error for two-three weeks. If it still exists, reset NVRAM.

Common Brother Printer Errors with Solution


The Brother Printer errors are shown as alphanumeric codes. If you know what these codes imply, you can understand the problem and solve them accordingly. Do you also see an error message on your Brother Printer machine? Here is a guide covering the most common error codes and their solutions.

Error Code: Error: E50

It implies the malfunction of the fuser unit. The fuser unit is that part of the printer which gets hot and binds the print on the paper. This error means either the temperature is too hot or is not hot enough.

Solution:

Switch off the printer for 5 minutes and switch it back on. Leave the machine unattended for 10 minutes without giving any command. If this doesn’t solve the issue, you need to replace the fuser unit.

Error Code: Error: E51

This indicates the malfunctioning of the laser unit. The laser unit writes the information on the drum surface. This error indicates the non-detection of a laser beam.

Solution:

Switch the printer off and then on it again. If you see the error again, the laser flap is defective or the laser unit needs replacement.

Error Code: Error: E52

It implies laser motor malfunctioning. You already know what a laser unit does (explained above.) There are a spinning mirror and motor inside the laser unit that drives it. Thus, this error suggests that the motor is faulty.

Solution:

Like the above two errors, this also gets resolved by power off and on. Power off and on helps us identify if the error is genuine or not. If it is genuine, the laser needs replacement.

Error Code: Error: E54

It means malfunctioning the main motor. This motor drives the main gear train which runs all printing functions.

Solution:

Again switch the printer off and on it again. If the error continues, turn on the printer after removing the toner. See if the motor works. If it does, you need to buy another toner. In case you still see the error, replace the main motor.

Error Code: Error: E60

It shows that the fan is malfunctioning. There are four cooling fans in a printer and this error means a fault in one of them.

Solution:

Switch the printer off and switch it on again. In case the error continues, seek help from a technical engineer to identify and replace the faulty fan.

Can’t see your error here? Get in touch with Brother Printer Support Customer Service to share your printer’s issues. Our professionals resolve all of them. We are accessible 24/7.

How to Fix the Common Printer Problems?

common-printer-problems

Printers are one of the most important assets in our lives because they serve us in many ways including homework, office work, fax, and scanning of documents. Nowadays, when your children have to get a printout for completing their homework, parents have no choice, but to have it at home.

Common Printer Problems with Its Solutions

However, printers last long and you don’t need help to fix them. Still, you may require some assistance in case of slow printing or not at all printing conditions.

Let’s have a brief look at some of the common annoying problems of printers:

Problem1: Too Slow Printing

Solution:

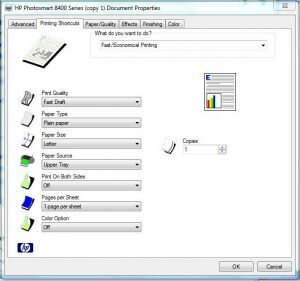
  • Reduce print quality by selecting Print > Properties and then choose reduced quality for printing.
  • You may set the print quality from Normal to Fast Draft by clicking screenshot at right. (HP Photosmart 8450).
  • Print web pages without graphics
  • Add RAM to the printer you are using.

Problem 2: High Cost of Ink and Toner

Solution:

We cannot recommend buying ink or toner from any vendors, who offer to refill at low cost, as they don’t give value for your money at all. Henceforth, we recommend you to buy higher-capacity cartridges, such that you could save upon cost. However, for a lot of printing work, you need to have a 250+ page yield ink cartridge or 2000+ page yield toner cartridge.

Problem 3: The wrong Printer Is Getting The Print Job.

Solution:

We are providing instructions for Vista and Windows 7 users. Sometimes, we have seen that without any proper reason, Windows start sending printing job to another computer, which may result in a mess at times. To avoid this in Windows 7, you need to follow these instructions:

Click start > select devices > Printer > right click on the desired printer > set it as default

Thus, you get rid of the trouble and start receiving the prints from the default printer. In the case of other versions of Windows, the steps may vary a bit. So, has a look at the below screenshot for Windows 7:

If you’re using earlier versions of Windows, these steps may vary a bit.

Problem 4: Printer Is Not Printing

Solution: Let’s check out the loopholes:

  • Check for the error message
  • Warning light at the device
  • Check for paper
  • Check the ink cartridge
  • Check that USB cable is connected to the computer
  • Check connections with wi-fi
  • Check for the default printer and its status.

In this way, you can come out of the general problems of printers without any glitches and enjoy a smooth working experience!

Official Customer Care Service for Fixing Printer Issues

If you have any issues in fixing the problems, then you can call the customer care number, email, or chat to find the right solution. You can also take help from forums and blogging sites.

Still, have trouble with your printer? – Try our third-party technical support for Printers!

Our third-party Printer technical support deals in all brands of printers widely in Hp printer support, Canon Printer support, etc. We are known for our instant response. We hire highly technical resources to bold the issues on the spot! So, if you are nearby or even away from us, call for personal or remote access customer care support for printer issues. Check our services to feel the difference!