As Microsoft withdrew support for Delta Sync protocol which was used as the synchronization protocol, it has caused trouble to many Windows Live Mail users who preferred to use the app to synchronize their Microsoft email accounts.
The company upgraded the service from Delta Sync to Exchange Active Sync synchronization protocol. This has resulted in a situation where users are not able to sync their Windows Live Mail account and getting an error message. If you are also experiencing this issue and looking for a solution, here is what you need to do.
Steps to Fix Windows Live Mail Syncing Problem
In order to fix Windows Live Mail syncing problem with Live, Outlook, Hotmail and other MS email account, it is suggested to add your Microsoft account using either IMAP or POP3 protocol in Windows Live Mail.
- Remove your current Microsoft account from Windows Live Mail and try adding it back with IMAP or POP3 protocols.
- To do this, you will need to open Windows Live Mail and go to the “Accounts” tab. Locate the “Email” button under the “Accounts” tab.
- A dialogue box will appear where you will be asked to provide information about your email account including password.
- Locate the option “Manually configure server settings” at the bottom and check the box. Then, click on the “Next” tab.
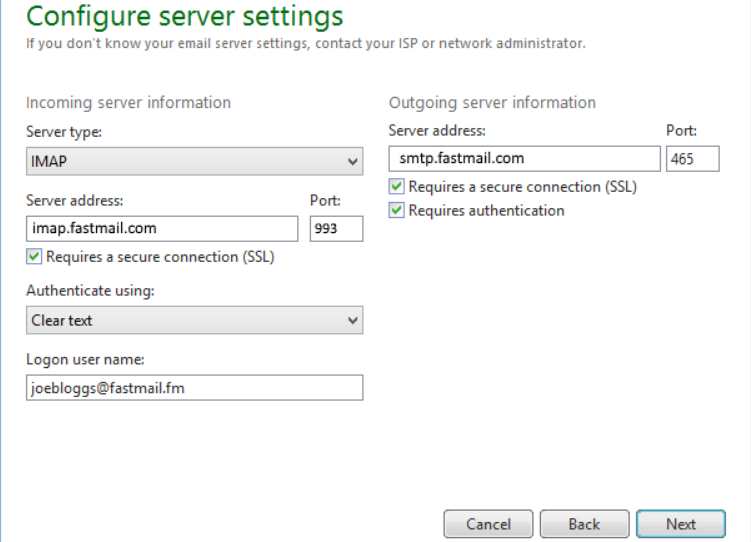
- Now, you will get a new page where you will see options for “Configure server settings”.
- For POP3 Protocol Settings, go to “Incoming Server Information”, change “Server Type” to “POP3”, and change “Server Address” to “pop-Mail.Outlook.com” and “Port” to “995”. Enter your Windows Live ID in the “Logon User Name” field.
- Next, under “Outgoing Server Information” change “Server Address” to “smtp-mail.outlook.com” and “Port” to “25”. Make sure you check the box next to “Requires a Secure Connection SSL” and “Requires Authentication”.
- For IMAP Protocol Settings, go to “Incoming Server Information”, change “Server Type” to “IMAP”, and change “Server Address” to “imap-Mail.Outlook.com” and “Port” to “993”. Enter your Windows Live ID in the “Logon User Name” field.
- Next, under “Outgoing Server Information” make the same changes as made in Step 7.
- Once you are done with everything, click on the “Next” tab and your email account will be added. Now try to sync Windows Live Mail to your email account and check whether it works.
To know more about Windows Live Mail syncing or any other issues, give us a call at our toll-free number. We offer remarkable services as our experts are well versed in solving issues related to email accounts.
We are a third-party Windows Live Mail Technical Support service provider. Our service can be availed anytime from anywhere as we are 24/7 open. Apart from calling our toll-free number, you can drop your query at our email or you can also have a one on one session with our experts through the live chat option.


